Editing 2D grids
To manually edit a 2D grid on a node by node basis, use the Edit... option in the context menu. The Edit option opens a form in which you can manually edit the node locations in a table.
The 2D Grid form consists of two distinct sections: the header section at the top of the form, where you specify information like the model and the grid name, and the lower part of the form with two tabs: Geometry and Properties, where you can enter the actual grid definition.
Note that you may copy and paste values from an Excel™ spreadsheet or a similar application into the spreadsheet.
2D grid header data
Model Select the model that contains the 2D grid you want to edit.
2D Grid Select an existing 2D grid for editing.
Geometry tab
The items on the geometry tab are for information only. In case the 2D grid is a resampled grid in a Seismic Interpretation you can choose to display the dimension of the grid per Inline/Crossline (select Inline / Crossline behind Indices per at the top of the Geometry tab).
Dimension
Start index First number of the step sequence.
End index Last number of the step sequence.
Index interval x
No. of steps Total number of steps.
Step length The size of one step in either direction.
Origin
Northing/Easting The location of the origin of the 2D grid.
Azimuth(GN) The azimuth (angle with the Northing direction) of the 2D grid.
TVDSS x
Properties tab
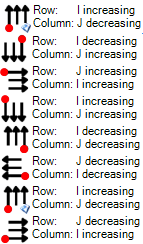
On the properties tab, first select a property from the drop-down list, next choose the order of the 2D grid. You can choose from the following for the order:
click to enlarge
First is the corner of the origin, second is the first corner the data encounters, and last is the direction the lines go.
After the header is filled in, the spreadsheet is filled with the default values. Now for every point a depth value can be specified. If you paste this data from another source please check what order it uses.
When you are finished entering the 2D grid depth values, click the OK button to add the edited 2D grid to your model. If there are any problems with your entries, you will see an error message in the Output Information view.